Beginning
< Introduction >
"If you buy one, you have to pay money for a luxury car. If you build, you need skill of a professional machinist." This is understanding of Japanese modellers about the livesteam locomotives. Actually the famous OS's variety is rather cheaper choice in Japan. To obtain a scale model of Japanese latest tender loco, we have to pay more than $20,000 for 3 1/2" gauge and $50,000 for 5" gauge! Also even if we try to scratch-build, Japanese guidebooks were already sold out several years ago. These are both causes and effects of lower population of livesteamers in Japan than in USA or U.K. However, in recent years, number of full scale steam locomotives revived in this country, consequently many of official garden railway rose and it brought up amateur livesteamers. I found one of such a garden railway in my neighborhood and it made me become a livesteamer!
This story isn't a guidance for beginners, because I am still a beginner! This is a documentary of a man who wish to build a locomotive by himself. Nobody knows if he will complete the job or not.
< What shall I build? >
With too much ambition and poor finances, I determined to build a loco from castings. Luckily I got the old Japanese guidebooks from a chap and purchased English books through the Internet. I chose Martin Evans' 3 1/2" gauge 2-6-2 tank loco, "William", as a first job because of its simplicity, nice looks and suitable size for both construction and service.
< Modification >
I have to transform the dimensions from imperial to metric so as to suit to Japanese tools and materials. As you know:
1" = 25.4 mm
But I adopt:
1" = 25.6 mm
Because the latter formula transforms 1/32" to 0.8mm while the former transforms 1/32" to 0.79375mm! Of course I have to obey the former formula just at the backgauge and the frame spacing. Also I have to change threads from ME to metric.
Later on I modified the appearance of the loco because my wife said the original William don't looks like a locomotive! William is a freelance but simulated powerful engine with a fat boiler. I guess it looks too boxy for her. I changed the scale from 1/16 (3/4"scale) to 1/12 (1"scale) imaging narrow Japanese national railroad. To increase width and height I will alter chimney, dome, cab and running boards, on the other hand I leave functional devices, boiler, wheels, valves and cylinders, as they are.
< Workshop >
Following are tools in my workshop
Lathe - Myford S7 and accessories
Miller - Japanese small one
Machine vise
Bench vise
Vertical slider
Rotary table
Files - Nicolson's variety
Drills, taps and dies
Hacksaw with high speed steel
Surface plate and height gauge
Digital caliper gauge
Propane blowpipe - Sievert set
I was eager to have the Myford Super 7 for its popularity in the model engineering world. However no second hand metric one is available and a new one costs almost double of U.K. price! I spent almost of the budget to get it and have no money to renew the miller. My old miller is a tiny one and suitable for HO model construction. So I have to do milling operations mainly using a vertical slider in the lathe. I never recommend for new comer to purchase all of the necessary tools at start. The reason is not only for its cost but also he cannot judge a tool is suitable for his work or not. In my opinion, Asian cheap tools which you can get at do-it-yourself shop aren't suitable for our purpose. If there is no model-engineering supplier around your residence, you can buy tools from commercial companies for industry. They usually reject personal trade. But if you explain what you want to do and how it brings profit to them, they accept you and you can get professional tools with bargain price!
< Handmade Tools >
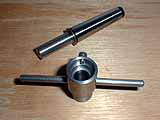
Die holder for tailstock : The arbor is made
from a commercial blank arbor.
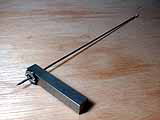
Wobbler : With brass ball and case hardened
2mm steel wire.
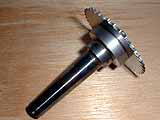
Cutter arbor : Ring and arbor are silver
soldered before turning.
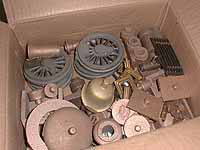
Castings from "Reeves":
Key items, 2 driving wheels and 1 cylinder
block, were out of stock in the supplier
at start. So I first tackled with the boiler
instead of the chassis.
Continued to "WILLIAM"