< Sand Traps >
I’ve been considering outsourcing brass lost-wax casting for parts production for some time. The goal is to mill intricate, complex precision parts, which are difficult to create through traditional machining, using Modela. Since Modela can't carve brass, I first mill soft modeling wax, which is then converted into metal parts using the lost-wax process. Previously, I had been using Modela to carve wooden patterns and then requested castings, but that method wasn’t capable of producing precision parts. With lost-wax casting, it’s possible to produce the precise components typically used in miniature railway models.

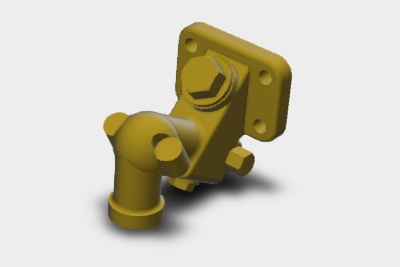
As a first step, I chose “sand traps,” commonly referenced precision parts for model steam locomotives. A sand trap is a device installed at the base of the piping from the sandbox to eject sand using compressed air, and it resembles a faucet. In the 5-inch gauge scale, the total length is about 20mm.

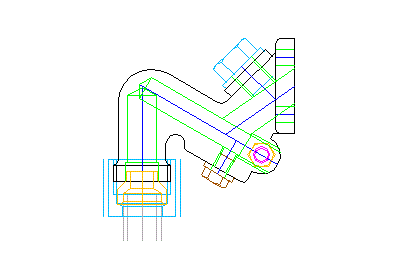
Since I’ll be using the sandbox as an oil tank, I need to route oil through the sand trap and connect it to the piping. I drill holes from the flange and the outlet of the sand trap and make a tunnel to connect them at an angle. The tunnel entrance will be plugged.
To briefly explain the lost-wax process: a wax mold is encased in plaster, the wax is melted away to leave a cavity in the plaster, molten metal is poured into the cavity, and after it solidifies, the plaster is broken away to reveal the finished product. I found a local lost-wax foundry. They accept casting requests with wax molds brought in, and I also purchased the modeling wax I needed from them.
Since the Modela can only machine from one direction, I decided to mill the sand trap in two halves. I cut the wax into a rectangular block, fixed it onto the stage with double-sided tape, and first machined the top half (which will be the left side when completed).
To fix the machined side down, I milled a fixture block out of chemical wood, placed the semi-machined wax into the fixture, and used double-sided tape again to secure it before milling the other side.
After finishing the milling with the Modela, it was time to drill the holes. I first took this stage to the foundry to confirm if drilling and casting would be possible. The shop advised that drilling all the way through might cause the plaster to break, but as long as the depth didn’t exceed the diameter of the hole, it should be fine. So, I limited the hole depth to the diameter, with the intention of drilling deeper post-casting.
I created jigs out of chemical wood to assist in drilling the holes in the wax mold. The jigs, shown in the photos, were made using the Modela as well.
By clamping the wax mold between the two jigs in a vise and aligning the drill with the jig holes, I drilled the holes into the wax mold. The jig faces are perpendicular to the holes, and aligning these surfaces with the top of the vise ensures the correct drilling angle.
With one wax mold completed, I had the first piece cast. The result was a faithful reproduction of the wax mold. The surface was polished after casting, and the side bulges, which are sprue marks from the molten brass being poured in, need to be filed down.
I then ordered six more castings, including spares. Since each casting requires its own wax mold, I milled six wax molds simultaneously to improve efficiency. When producing parts in larger quantities via lost-wax casting, it’s common to first make a master, then create wax molds using a rubber mold. But since I only needed six, it was more efficient to mill them all with the Modela.
The additional castings came with sprue marks on the back of the flange as well. After cutting off the sprue marks with a fret saw and filing them down, the part was ready for finishing. In the photo, the piece on the left is unfinished, while the one on the right is finished.
I needed to thread the male end of the faucet to connect it to the piping. However, due to the sand trap's body obstructing the use of a threading die, I used a lathe to cut the threads. I custom-made a threading tool that wouldn’t interfere with the body, and using a four-jaw chuck, I threaded the piece.
My Myford lathe doesn’t have a quick-change gearbox; instead, I manually switch out the gears. By adding just one optional gear, however, I can set it up for cutting metric threads. The gear I needed, shown in the photo, has 21 teeth and I ordered it from the UK.
After threading, I drilled additional depth into the lost-wax part. I reused the same jigs from the wax drilling process. I also tapped holes for dummy bolts and plugs.
I fabricated washers from brass rod for the dummy bolts. I drilled out a cylinder, then used a parting tool made from a hack saw blade to cut out the washers, making them in bulk.
Finally, I installed the dummy bolts and washers. The cross holes were plugged with set screws, and I drilled mounting holes in the flange to complete the assembly. I also made ferrules and locknuts for the connections.